Garden News Magazine recipes for December

If you’ve received your copy of Garden News Magazine this week, here’s the recipes I mention in my column. Above is the summerhouse where I write my pieces, and where I sit and make my cherry marzipan chocolates.

The recipe link for Cherry Marzipan Chocolates is here :

https://bramblegarden.com/2018/12/04/family-favourite-recipes-chocolate-marzipan-cherries/

They are very quick to make and children love creating them. They make tasty home-made presents for Christmas.

I also write about Chocolate and Orange Panettone. Start saving your tins now to make these delicious treats. They are very easy to make and look beautiful. Get the children to make potato stamp labels. Be as creative as you like. Everyone can get involved.

Here’s the link: https://bramblegarden.com/2019/12/02/christmas-recipes-chocolate-panettone/

I write about turning my satsumas from the greenhouse into a liqueur. The recipe comes from Bob Flowerdew, replying to me on twitter when I asked what I could do with this year’s prolific harvest. It’s been a good summer for growing citrus. Bob always has great suggestions for what to do with produce from the garden, and is generous with his advice.

Here’s Bob’s recipe for Satsuma Liqueur :

And finally, I was talking on the radio last week, when I mentioned I was making Sloe Gin. Here’s the recipe, with thanks to garden writer Barbara Segall, who inspires me on a daily basis to try something new.

Sloe Gin

450g sloe berries -or whatever you can find. If you only have 300g, use those.

350g caster sugar

710ml gin

Kilner jar or lidded jar

Place the ripe sloe berries in the freezer to break the skins. Add all ingredients to a large kilner jar. Swirl the contents every day for a week, every week for a month, and every month for a year. Strain the gin. Use the berries for cakes or trifle.

It’s wonderful to have a bottle on the north-facing kitchen windowsill. Mine has changed colour now and it’s a joy to see. Almost like a stained glass window.

Barbara Segall has written many garden books, all highly recommended. One of my favourites is The Christmas Tree. A beautiful stocking-filler. Find out more here : https://thegardenpost.com/category/christmas-tree-book/

https://www.ebay.co.uk/itm/The-Christmas-Tree-book-by-Barbara-Segall-NEW-/174501320740?_trksid=p2349624.m46890.l49292

For more suggestions on books, I also recommend The Creative Kitchen by Stephanie Hafferty. I reviewed the book here:

https://bramblegarden.com/2018/11/18/the-creative-kitchen-book-review/

Here’s a link for Georgie Newbery at Common Farm Flowers for growing cut flowers, floristry and Christmas wreath workshops and courses, in person, and on-line. Vouchers make a great present for any gardener. https://www.commonfarmflowers.com/collections/workshops

Thanks for reading! Have a great week.

Tomato and Thyme Tart – family favourite recipes

Suddenly, at this time of the year, the kitchen windowsill is covered with tomatoes. All sizes from giant heritage beefsteak Marmande to tiny cherry types such as Sweet Million and Red Robin. Some are bright sealing-wax red, soft and ready to eat. Some shine like emeralds, green and firm. They will ripen over the coming weeks.

Here’s a favourite recipe, perfect for utilising your tomato harvest. As usual, it’s a quick and simple idea. It takes 10 minutes to make, and 15 minutes to cook. Tomato and herb tarts travel well and are suitable for picnics too. Enjoy!

INGREDIENTS

1 pack ready rolled puff pastry

1 egg yolk -beaten

7oz /200g cheese ( can be Cheddar, gruyere-or whatever you have)

14oz /400g tomatoes, thickly sliced

Few sprigs of thyme – leaves only

1tbsp olive or rapeseed oil

Salt and black pepper

METHOD

Preheat the oven to 210C /190C fan/ gas mark 7

Cover two baking trays with either re-usable silicone sheets or baking parchment to prevent the tarts sticking.

Roll out the pastry. Use a 7” tea plate as a template. Lay the plate on the pastry and use a sharp knife to cut a circle.

You’ll get two 7” round tarts, or one 7” and four 4” tarts from a roll of pastry. The off-cuts of pastry can be used for cheese straws. Just add grated cheese and twist to incorporate.

Transfer the circles of pastry to the baking trays. Use a blunt knife to score an edge to each circle, 1.5cm or 1/2” wide.

Brush each border with the beaten egg. Use a fork to prick over the base of the tarts to stop them rising.

Pile grated cheese into the centre of the circles. Take care not to get any filling on the edges, or they won’t rise.

Arrange slices of tomato in concentric circles on top of the cheese.

Season with salt and pepper and scatter over the thyme leaves.

Drizzle over a few drops of olive or rapeseed oil

Bake in the oven for 12-15 minutes or until the pastry edges have risen and are golden brown and the filling is bubbling. Garnish with some fresh herbs.

Can be served warm or cold. Can be frozen.

For a vegan alternative, omit the egg and use melted vegetable margarine and use vegan cheese.

Some of the 4” tarts, fresh from the oven

My Marmande tomatoes were prolific this year. I sowed seeds in February, pricked seedlings out in March and planted them in their final 12” pots in May. I grew mine in an open-ended poly tunnel, which protected them from the worst of the weather.

Pictured above, some of the tomatoes we’ve grown here. Recommended varieties include blight -resistant Crimson Crush. Also Gardeners Delight, Tumbling Tom, Sweet Million and Golden Sunrise.

I listened to a podcast called Fresh from the Pod this week. Gardener and writer Tamsin Westhorpe was interviewing Chris Collins. Tamsin is the gardening world’s version of Michael Parkinson, in my opinion. It’s fascinating to get a real insight into the lives of our gardening personalities. Anyway, half way through the interview, Tamsin says she never turns any opportunities down. She never says no to anything. Always has a go, because you never know where it might lead. So, this gave me courage to try something new this week. As you know, I love cooking. My happiest memories are sitting around a table with my parents and grandparents and just being fed the most delicious meals. Just that feeling of being loved and cared for. It lives on in my memory like an indelible photo album. Well, it’s gradually become my turn to produce memories for other people. I’ve loved cooking for my children and the recipes here are written down for them, incase they ever need them. And today I also recorded my first “grow it, cook it, eat it” for Ben Jackson at BBC Radio Leicester. They have a ‘Food Friday’ segment which I’ve always wanted to have a go at. Remembering Tamsin’s words, I ventured forth! It was a shaky start, as we were cooking outdoors (social distancing) and the wind was blowing my bits of baking parchment about. The cat wanted to join in. He usually “helps” when we are gardening. And the neighbour’s dog started barking. Ah well, nothing is perfect in real life, is it. It was a fun thing to do and I hope you enjoy listening. It’ll make you laugh, I’m sure.

At 2.08.26 in the timeline. https://www.bbc.co.uk/sounds/play/p08nvhpx

In a Vase on Monday – revisiting RHS Chelsea Flower Show.

Well, we should all be at the Chelsea Flower Show today. But it’s been cancelled, like most spring and summer events. So instead I’m sharing photos from last year. Plants and flower arrangements I made a note of, for my own garden. Enjoy this dip into my photo album.

Kelways Peonies. I love Lemon Chiffon, (cream) Seashell, (pink) Avalanche, (white) Nymph, (pink).

They don’t last long, but such a glorious sight in mid May. I wouldn’t be without peonies.

Lupins from West Country Lupins. Just perfection. I bought this one

And this one. Lupin Masterpiece. Such a glorious plum colour.

David Austin Roses. This one is new variety, Tranquility. Very calming colour.

And new rose Desdemona. Beautiful at all stages from tight bud to wide open. Gorgeous scent. Stands up to the weather really well. Flowers shrug off rain and don’t ‘ball.’ Recommended.

Pinks. This is the new Tequila Sunrise. Lovely changes of colour as the flower ages. Amazing scent.

It’s wonderful to have the pinks side by side so you can compare them. The scent is just amazing in the heat, and contained by the roof of the marquee. A lingering memory of Chelsea.

Some of the amazing flower arrangements at the show. It really is a florists’ paradise.

These were still being created on press day. I stood for a long time watching the process.

This tower of flowers was spectacular.

Close -up detail of the flower-filled tower.

This explosion of foxgloves and cow parsley is my favourite.

Details for this lovely arrangement.

I also studied this arrangement created using test tubes. Really simple and lovely. Simple is what I always go for. As you know.

So I came home and made this from flowers in my garden. Inspired by all the lovely blooms I’d seen at Chelsea. There’s wild daisies, blue corn flowers and cow parsley as a background with green ivy covering the mossy wreath.

I hope you’ve enjoyed this re-visit of last year’s Chelsea Flower Show. I’m going to be watching all the on-line and televised content. This year, it is all about finding ways around problems and learning how to enjoy the things we love. Gardening – growing food and flowers- has been a saving for me. It’s kept me occupied and stopped my thoughts running away. It’s kept be grounded and focussed on keeping calm and helping others. Gardening is also a shared joy. Although we can’t see our friends and family, we can still talk about our gardens and share photos. It keeps us connected, and reminds us we are not alone.

If you listen in to BBC Radio Leicester, send your photos to mid-morning host Ben Jackson. Sharing our gardens is a lovely thing to do. And I’ll be talking about what I’m growing on Wednesdays and Thursdays, alternating with my gardening team member Josie Hutchinson. And also now and again on BBC Radio London.

Links: RHS Virtual Chelsea Show https://www.rhs.org.uk/shows-events/rhs-chelsea-flower-show

Kelways Nursery : https://www.kelways.co.uk/category/peonies/1/

West Country lupins : https://www.westcountrylupins.co.uk/index.html

David Austin Roses :https://www.davidaustinroses.co.uk/delivery

Join in with the In a Vase on Monday meme and see what eveyone is growing and putting into vases this week, all over the world. : https://ramblinginthegarden.wordpress.com/2020/05/18/in-a-vase-on-monday-the-jewels-and-the-crown/

BBC Radio Leicester Gardens Hour 22 April 2020

If you were listening in to BBC Radio Leicester for Gardens Hour today, I’ve written some notes to accompany the programme.

I’m working from home at the moment. The oak tree above has just burst into leaf. I can see the tree from the top of the paddock. The swallows returned here last Wednesday, and we’ve seen pipistrelle bats over the garden.

Blossom has been fabulous this year, with no rain to spoil the flowers. I’m sitting under this Prunus Kanzan cherry tree today to answer questions and talk about my gardening tasks.

We had a question about an apple tree failing to establish.

If your tree is failing to thrive, it usually indicates a problem with the growing conditions. Poor growing conditions will stunt any tree or shrub.

Water any newly -planted trees well. Soil may be dry around the roots even when the surface appears moist. Check with a trowel to see how far the water is penetrating the ground.

Weeds and grass compete with trees for moisture. Keep a weed and lawn -free zone at least 1m in diameter around the plant.

Mulch locks in the moisture and helps feed the tree. Apply a mulch a good couple of inches deep around the tree, avoiding the trunk. (mulch piled up against the trunk can cause ‘drowning,’ so take care it doesn’t get pushed up against the tree).

You can use your own home-made compost or composted bark for the mulch. Do not apply to dry ground, as it can also lock -in drought.

You can place a drainage pipe in the ground alongside the tree at planting time, which helps water reach the roots. However, take care, as too much water can cause water logging, which is also detrimental.

Feed with a potash fertiliser, which promotes fruit and flowers.

Salix Flamingo – wiki commons photo.

We had a question about a Salix Flamingo willow tree failing to thrive. The tree has come into leaf and the leaves have shrivelled.

I’ve found this tree difficult to grow. It’s grown for its new, shrimp pink leaves which emerge in April. These leaves are delicate and easily damaged by cold winds and frost. Too much direct sunshine on emerging leaves can also cause them to shrivel. We have had a combination of high daytime temperatures, cold east winds, and plummeting night time temperatures. In a sheltered garden you would have no problems, but in a slightly more exposed spot, the tree struggles. Also, being from the willow family it requires plenty of moisture. We haven’t had any rain for several weeks and the ground is parched- despite all the record-breaking amounts of rain we’ve had over autumn and winter.

Usually, the tree recovers and produces a new set of leaves to replace the ones that have shrivelled. Watering and throwing some fleece over at night usually nurses it along until we get more even growing conditions in early summer. I’ve known them to suffer from a type of rust, and also canker. But apart from that, they are very pretty trees. They either like you, or they don’t though!

We had a question about a montana clematis failing to flower. This is my clematis Montana Wilsonii. The one the caller had was a pink variety, planted last year and growing in a pot next to an archway. The clematis on the other side of the arch was doing well.

Clematis montana flowers on the previous season’s wood. The caller hadn’t pruned it, but sometimes a montana clematis will take 2-3 years to settle into flowering as its first thought is to grow to the top of the archway.

Clematis don’t do as well in pots, unless they are a really good size and you can keep up with the watering requirements. So it would be best to plant the clematis in the ground and keep it well fed and watered. Potash feed, again, for flowers. And prune immediately after flowering, although I hardly prune my montana clematis to be honest. It’s pretty low maintenance, once established.

And finally, we had a caller wanting to buy a Venus fly trap. They are usually sold at local garden centres, which of course, are not open at the moment. However several are making deliveries, so it’s worth ringing round to source supplies of plants. I’ve found this one on line from QVC. I’ve bought various plug plants, bedding and bird food from QVC and found the service to be quick and reliable. However, I’ve never bought any fly trap plants from them, so can’t say more than I have managed to find a supplier.

I hope you’ve found these notes useful. Please listen in on Wednesdays at 12.30 with Ben Jackson and on Sundays (usually) with Dave Andrews at 1pm on your smart speaker, DAB 104.9FM or on BBC Sounds.

It’s great to be involved with local radio gardening and we try to offer something for experienced gardeners wanting to try new varieties and grow for shows, and also for those who have never grown anything before. All questions welcome. We will try our best to help. I am part of an experienced team.

Comments box is right at the bottom of the page, below hashtags, social media sharing and links.

BBC Sounds to listen back: https://www.bbc.co.uk/sounds/play/p088w205. At 2.37.30 on the timeline.

Links : https://www.qvcuk.com/Thompson%26-Morgan-Dionaea-Muscipula-%28Venus-Fly-Trap%29-9cm-Pot-x3.product.518780.html?sc=Froogle&ref=fgl&source=froogle&utm_source=google&utm_medium=base&utm_campaign=base&cm_mmc=PPCSHOPPING-_-Google_Shopping-_-SmartShopping-_-Garden&Leisure&gclid=CjwKCAjw1v_0BRAkEiwALFkj5nSbQtMrf4di1C69MLikRT3XMgWNUhDGsymlRFAS-4yMUnqRnj5vxRoCm6AQAvD_BwE&

What’s flowering in the garden 7th April 2020 -BBC Radio #SowAlong #BBCRadioSowAlong

If you have been listening in to Gardens Hour on Wednesdays on BBC Radio Leicester, you’ll have heard our ‘ten minute tips’ recorded in Ben Jackson’s garden. I always come home and plant the same varieties in my windswept country garden. Ben’s plot is in a lovely sheltered walled garden in a village. His soil is beautifully free-draining, in a garden which must have been worked for 100 years. Mine is cold wet clay, created from farm land over the past 30 years. It’s an interesting contrast and I love to see how plants perform in both our gardens.

Here’s an update on plants, showing what they are looking like today.

We planted tulips for cut flowers on 29th October. These are Exotic Emperor, a new early-flowering tulip, a double form of the popular White Emperor. It has a long flowering period with delicately green flamed cream petals. Looks good for nearly six weeks.

We planted a ‘cut flower mix’ and mine included this lovely Tulip Flaming Purissima. This comes in a range of creams and pinks. Very pretty and reminiscent of the old fashioned flame tulips made famous in the Tulip-Fever era. Very long lasting, and weather resistant.

We planted bulbs ‘lasagna’ style in layers. Here’s my big Italian pot by my front door. This had snowdrops and dwarf iris in January, dwarf tete a tete daffodils in February, and now today has Hyacinth Blue Jacket, Exotic Emperor tulips and scented Geranium narcissi. When these are over, I’ll replant the pot with scented -leaved geraniums for summer.

In both our gardens we planted a range of daffodils to flower from February right through till the end of April. Here’s my pheasants eye narcissi planted under the cherry trees in the orchard. I’m so pleased with these, I’ll mass plant them in September for an even better display this time next year. I’ve gone round the garden making notes and taking photos to remind me where there are gaps and what changes I want to make. If I didn’t make notes, I’d forget by the time September arrives.

Talking about daffodils, we planted these Paperwhite narcissi on December 2nd. Some flowered at Christmas, but I held some pots back in the cold potting shed and brought them out a week apart so that I could have flowers for vases right through to the end of a March. Flowering times are dictated by amounts of daylight and heat. So plants can be manipulated to flower over a period of time.

We planted up our dahlias on 31st January. These were overwintered in a frost-free shed. I took 2″ cuttings in February and these have rooted in the propagator in 3″ pots at 18C. Above are the dahlias making really good growth in their seed trays, half filled with compost to start them off. They will stay in the greenhouse until the end of May.

We sowed our tomatoes on 28 February, and I pricked them out mid March. They are growing nicely just out of the propagator and on the greenhouse benches. I keep the greenhouse heated at 6C.

On 9th March we planted our tiny plug plants which cost about 60p each. We planted them individually in 3″ pots and put them on a sunny windowsill.

They have grown really well, and I’ve managed to take three lots of cuttings from the mother plants, which means lots of bedding plants for free. Taking cuttings makes them grow strong and bushy too, instead of tall and spindly.

We also planted up some impatiens plugs into 3″ pots. These are now in flower and I’m putting them into their summer containers to grow on. I didn’t pay for these plants. They were free samples from the grower, Ball Colgrave.

If you are listening in today, Wednesday 8th April, this is where I’m talking from because I’m isolating due to covid. I’ve got 100 cosmos seedlings in 3″ pots including a new variety Apricot Lemonade. I’m also growing calendula pot marigolds which are great for bees and butterflies. I’m growing the very pale lemon Snow Princess, and pretty calendula Orange Flash.

I’ve just planted my new potatoes, Charlotte and Lady Christl in two of the divided beds. They are planted 12″ (30cm) apart, 4″ (9cm) deep.

I’ve also planted my broad beans, De Monica which is a new variety specially bred for spring sowing. I’ve sown double rows, with plants and seeds 9″ (23cm) apart. Seeds were planted 2″ (5cm) deep.

And this is the view from the greenhouse and potting shed. Turn up the sound to hear the birdsong. There’s a bank of wild cherry trees on two sides of the garden.

I hope you’ve enjoyed this tour of my greenhouse and garden. Hopefully the photos have jogged your memory about what we’ve been growing for our ‘ten minute tips.’ I’ll keep you posted on the progress of all these plants. I’m hoping the garden is going to be quite productive and very colourful this summer. That’s three uses of the word ‘hope,’ but under the circumstances, I think we all need some hope, don’t we.

Links : BBC radio Leicester Gardening – Sundays 1-2pm and Wednesdays 12.30 -1pm at the moment, subject to change due to covid. https://www.bbc.co.uk/sounds/play/live:bbc_radio_leicester

DAB 104.9FM and at BBCSounds. Ask your smart speaker to tune in to BBC Radio Leicester.

Update: today’s programme starts at 2.36.23 on the timeline. https://www.bbc.co.uk/sounds/play/p087sjhn.

Dahlias -Overwintering Dilemmas- 19 November 2019

I’m not usually a ditherer. I have a plan of action and I just get on with it. But the weather this autumn has put a spanner in the works. Unprecedented amounts of rain mean we are five weeks behind schedule with all jobs in the garden. And I am only now managing to sort out and store my precious dahlia collection.

This year, I’ve decided to leave half in the ground – in a raised bed with free-draining soil- and bring half indoors. This way, I’ve cut my losses. I’ll have some plants indoors to take cuttings from next spring, even if the ones outdoors fail to survive.

Here’s what I’ve done with the ‘outdoor’ dahlias:

OVERWINTERING DAHLIAS IN THE GROUND

1. I’ve waited until all the foliage has been blackened by frost. This sends the plant instructions to go into dormancy.

2. I’ve removed half of the foliage and dead flower heads. The remaining foliage has been folded over to cover the plant. Stems are hollow, so if you cut back stems and leave them upright they act like straws, directing rainwater down to the tuber.

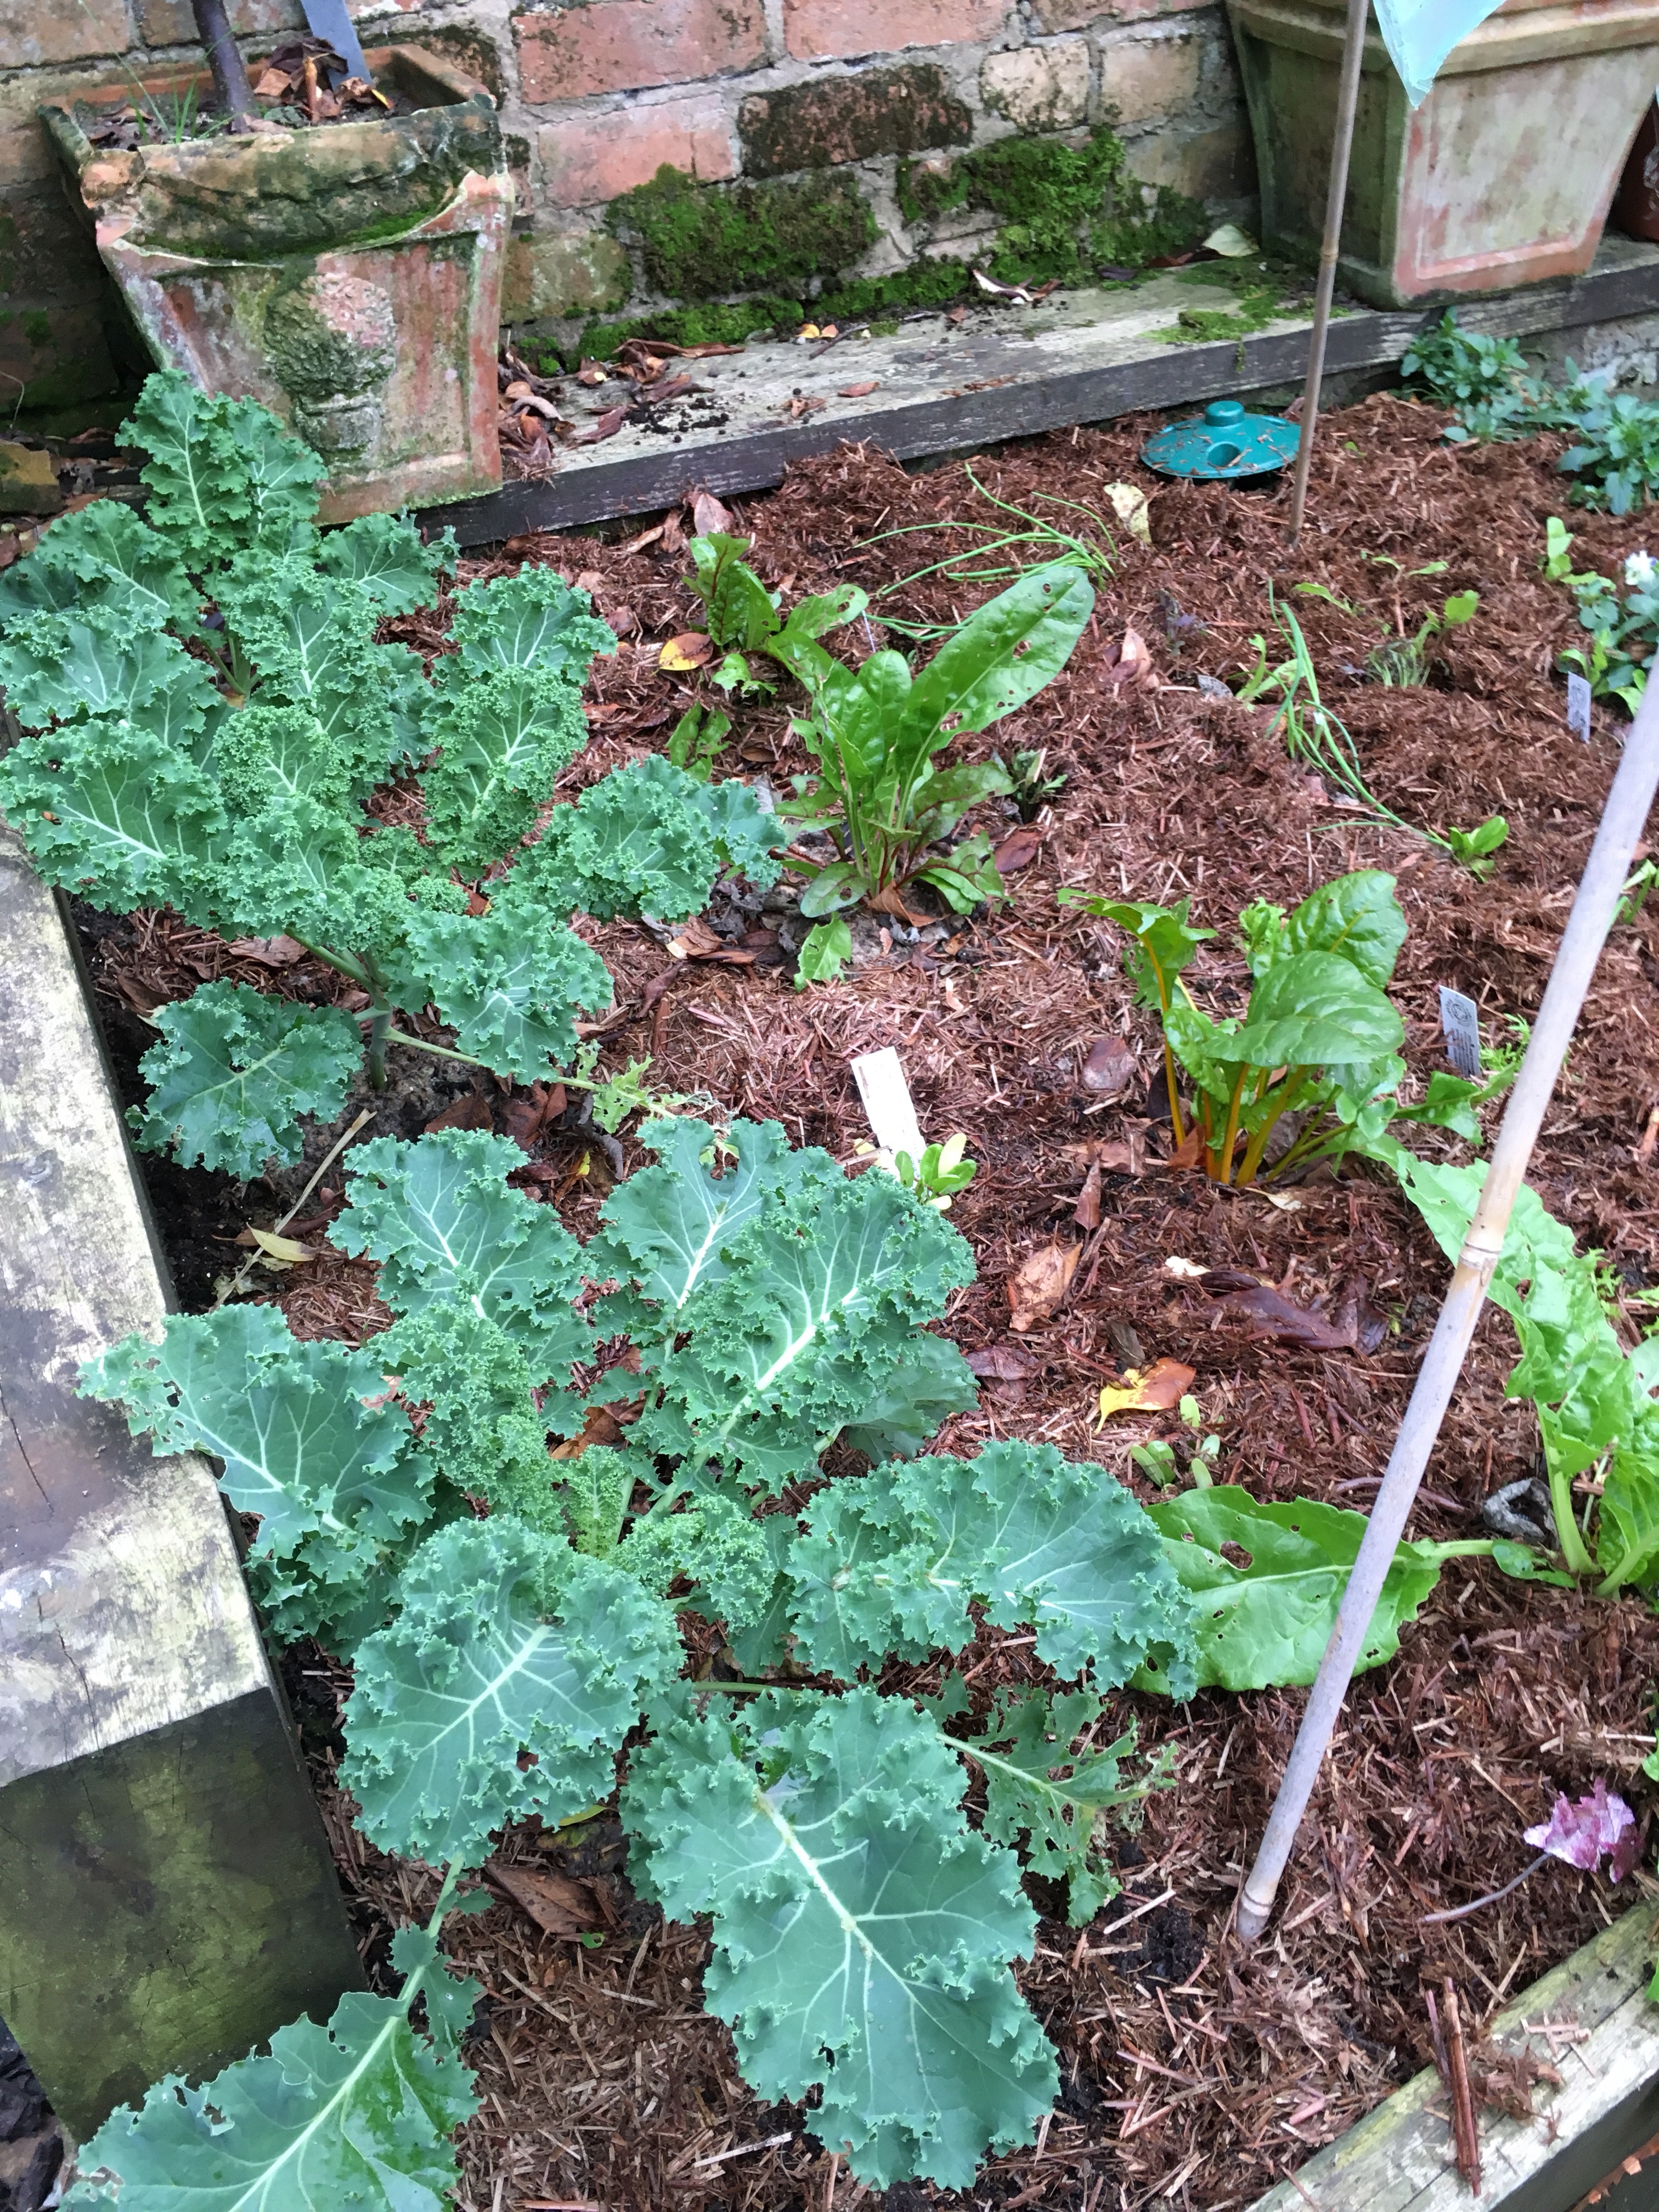
3. I’ve put a 3″ deep mulch of compost over the tubers, followed by 6″ of dry leaves or straw.

4. Dahlias need to be kept dry and frost free, so I’ve covered the bed with some cloches, and packed the ends with dried leaves. These 1.3m by 3m beds are mounded up like ridge and furrow farm land. They are no-dig which also seems to aid drainage over winter by protecting the soil structure. No-dig basically means adding a few inches of compost every time you harvest a crop, and simply re-planting through the compost. No back-breaking digging is required.

LIFTING DAHLIAS FOR INDOOR STORAGE

For my indoor ‘insurance policy’ dahlias I’ve done the following:

1. Waited until the frost has blacked the foliage. Checked the soil. It is like suet pudding, wet and claggy. Heavy clay. This is an area of garden due a lot of compost mulch over the winter.

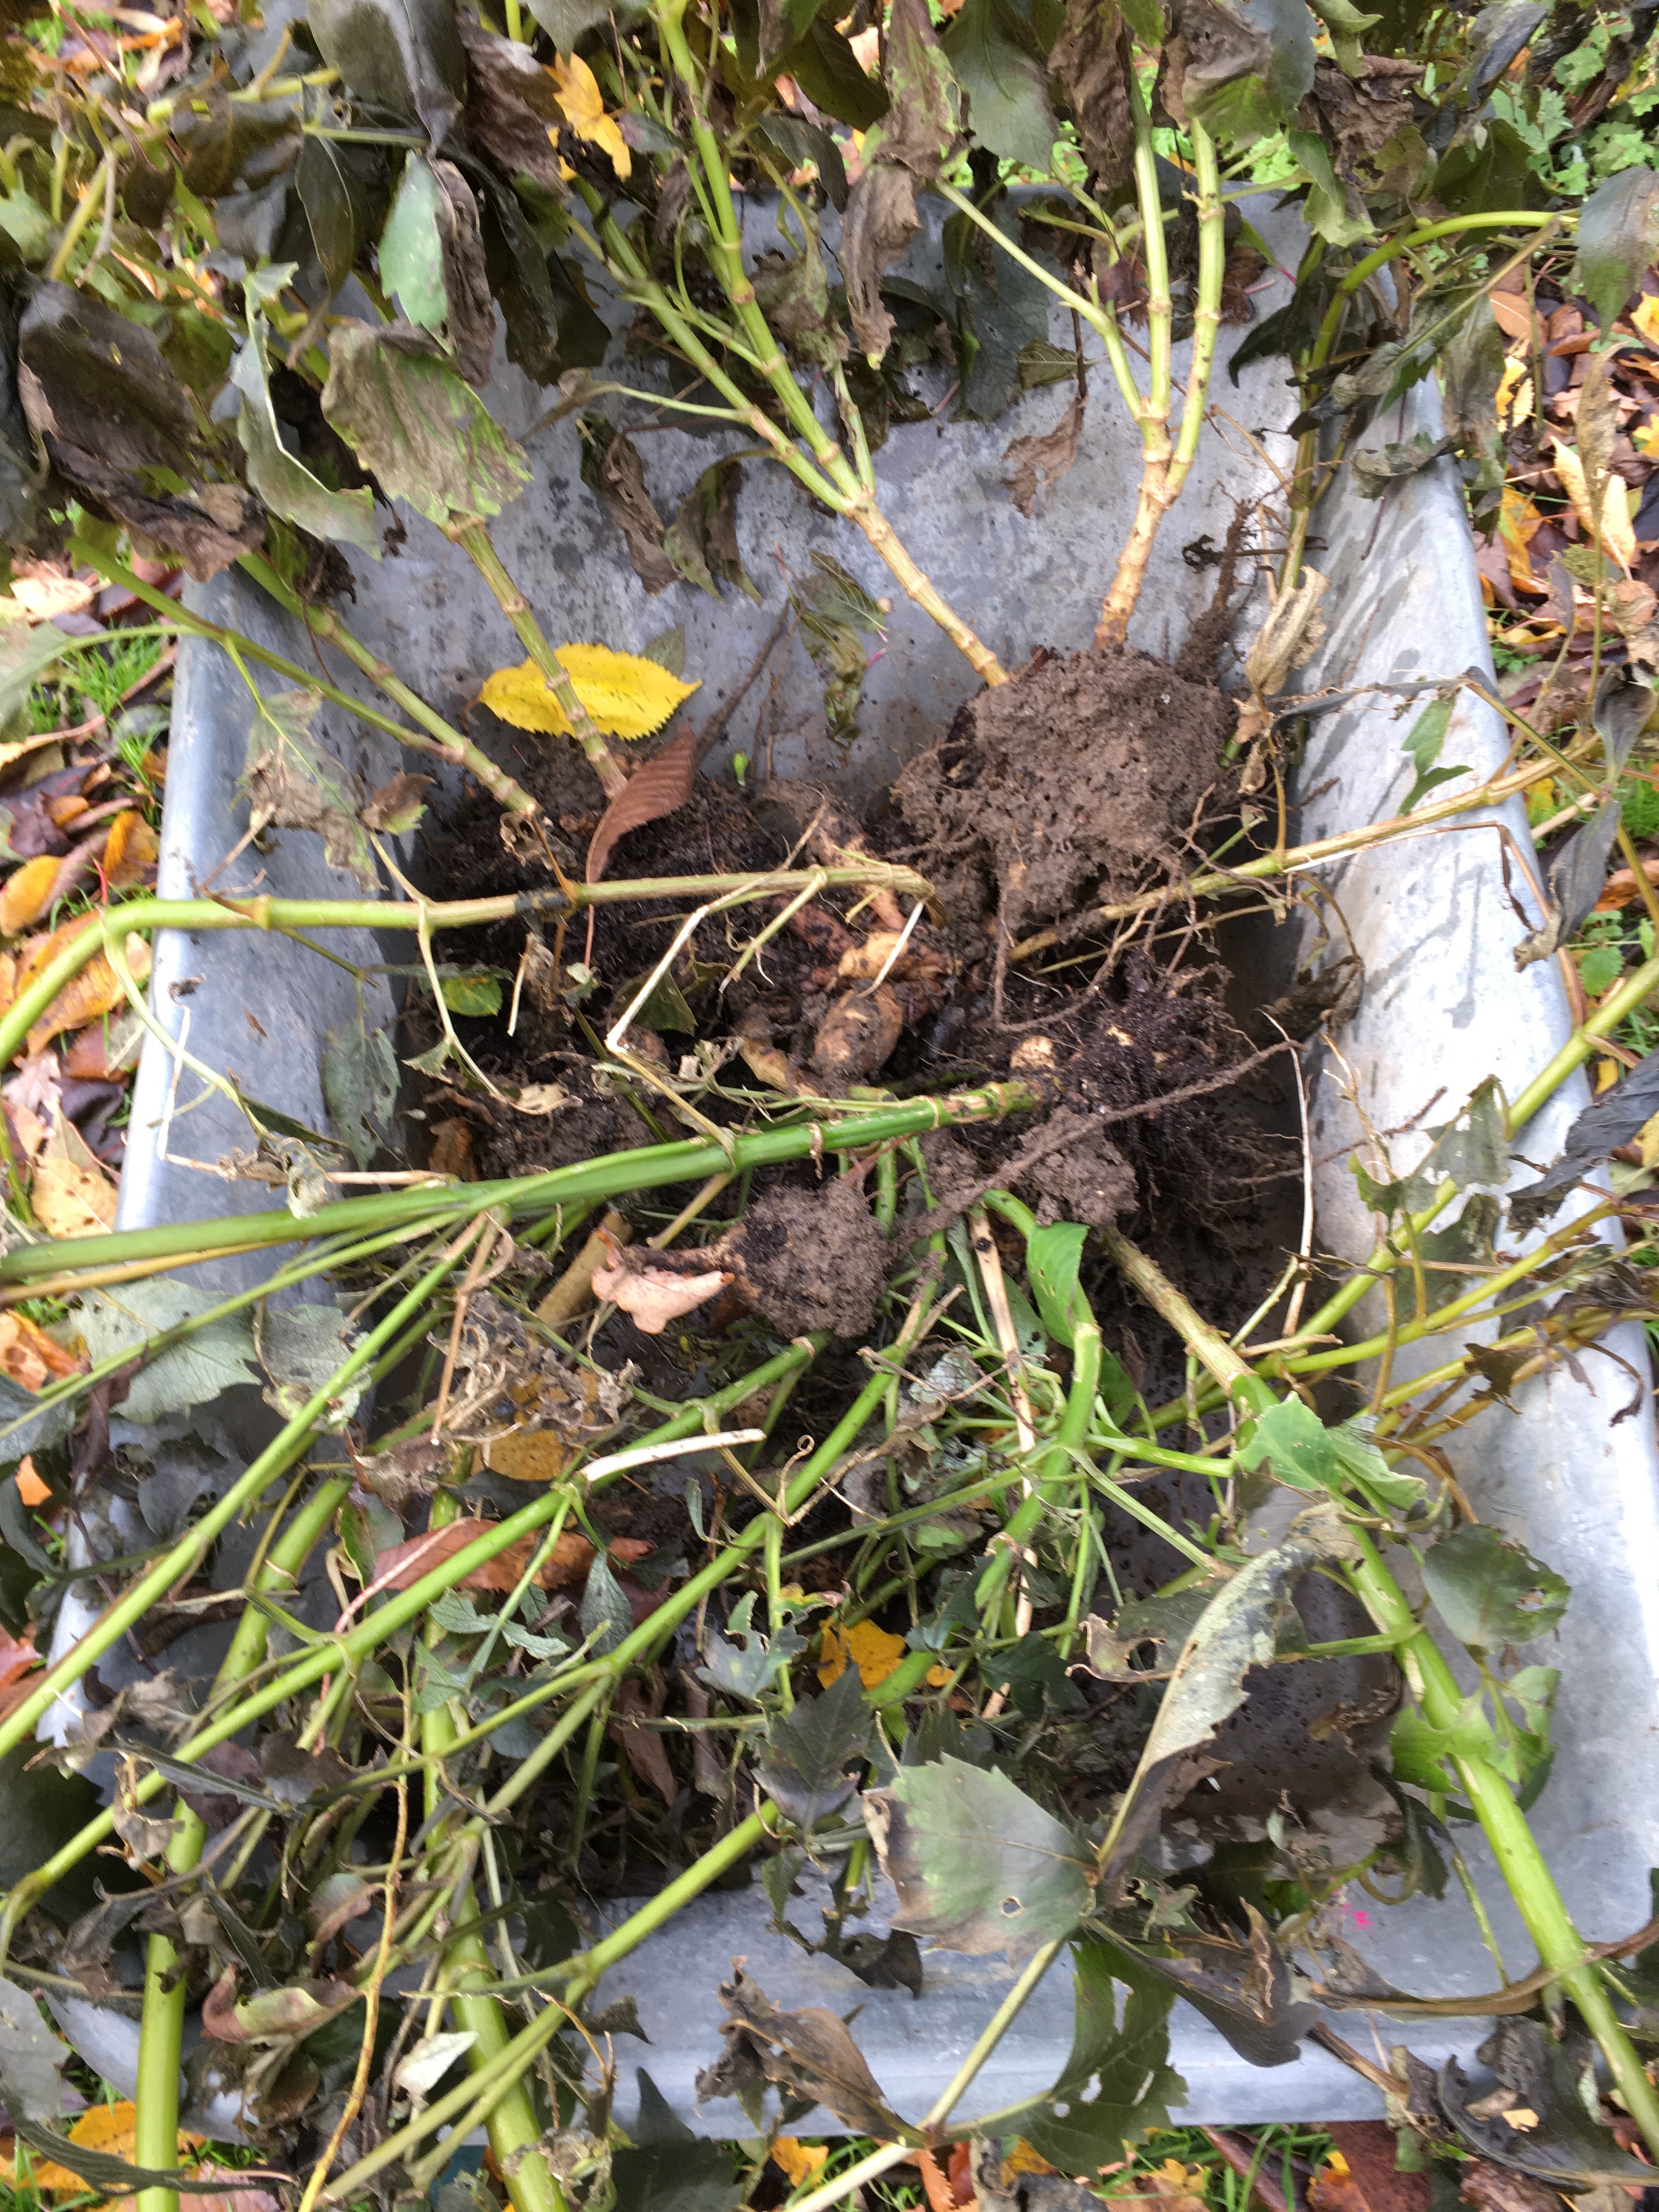
2. I’ve gently dug out the dahlias, being careful not to bruise them. Wounds are vulnerable to rotting, so care needs to be taken.

3. I’ve cut the stems back to 3″ and turned the tubers upside down to drain. They will go into a frost free potting shed.

4. When drained, I’ll store the tubers in dry vermiculite, straw, or compost, in the dark, under the potting shed table. Temperatures need to be 2-3C. Dahlias will survive a few degrees of frost- if they are dry. If it gets very cold, I’ll throw some fleece or old blankets over the tubers.

In February, I’ll place the tubers in seed trays of compost in gentle heat to bring them back to life. When they have shoots 1″ tall, I will split the large tubers in half with a sharp knife, making sure both halves have some stem.

I’ll also take basal softwood cuttings when shoots are 1″ tall, using a sharp knife and taking a small sliver of tuber with the cutting. These will be grown on in a frost free greenhouse and planted out end of May. Cuttings will make good size tubers and will flower in one season.

You can lift and save tubers from seed-grown dahlias as well. Just save the best ones, as seed produces very variable results.

Which option are you taking with your dahlias?

A BIT ABOUT HISTORY

It’s fascinating to hear that dahlias have been grown in Europe for 200 years. They originally came from Mexico and were grown in the botanic gardens in Madrid towards the end of the 18th century.

Dahlias are named after Andreas Dahl, a Swedish botanist, scientist and environmentalist. Plants come in every colour -apart from blue! The smallest are the Lilliput Series and the largest are dinner plate sized, a foot in diameter.

Dahlias are categorised by their appearance; there are waterlily, Pompom, collarette and cactus types. Something for everyone, really.

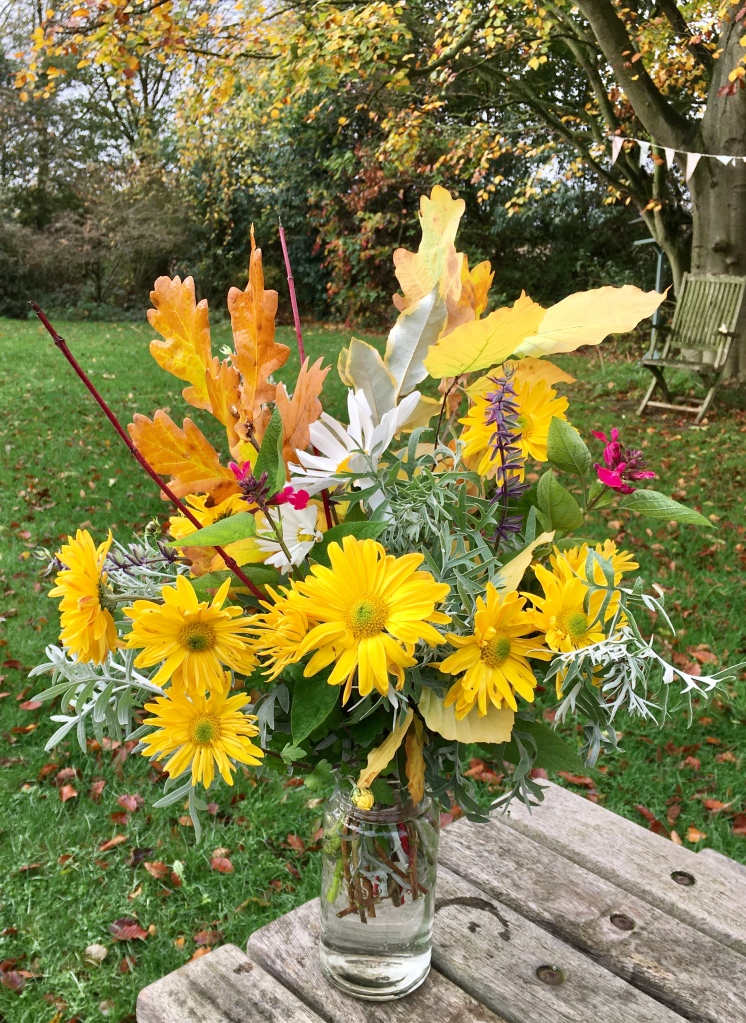
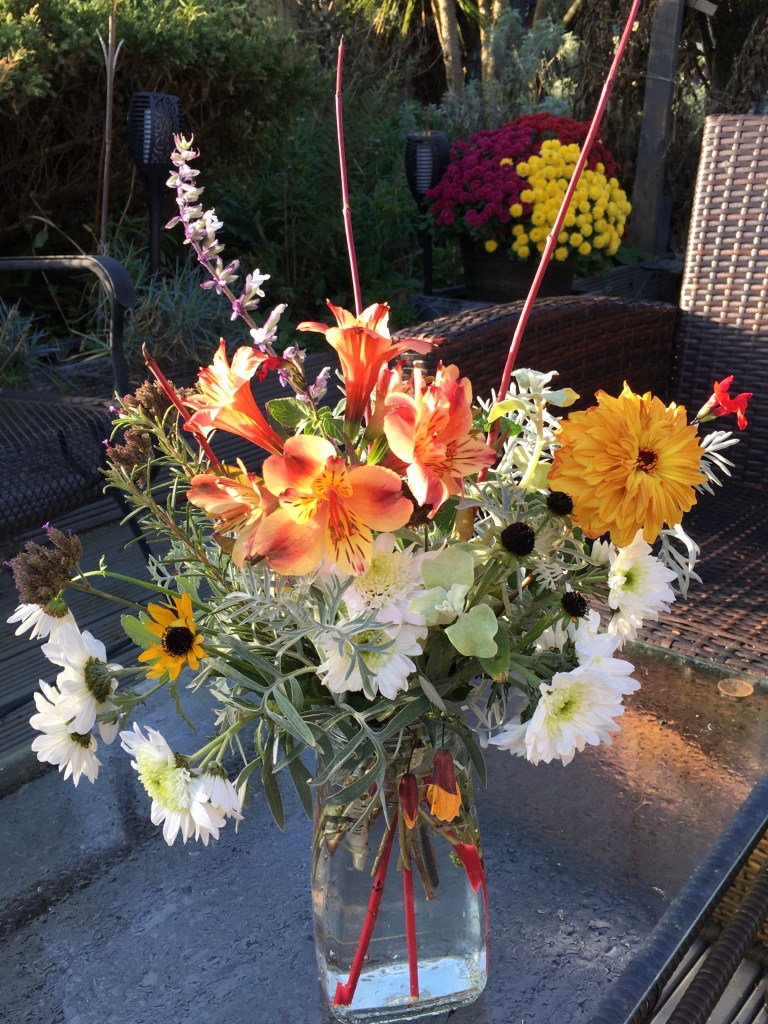
Here’s some of my favourites from my cut flower garden.

Arabian Night. Deep, dark velvety red. A stunning dahlia for cut flower work.

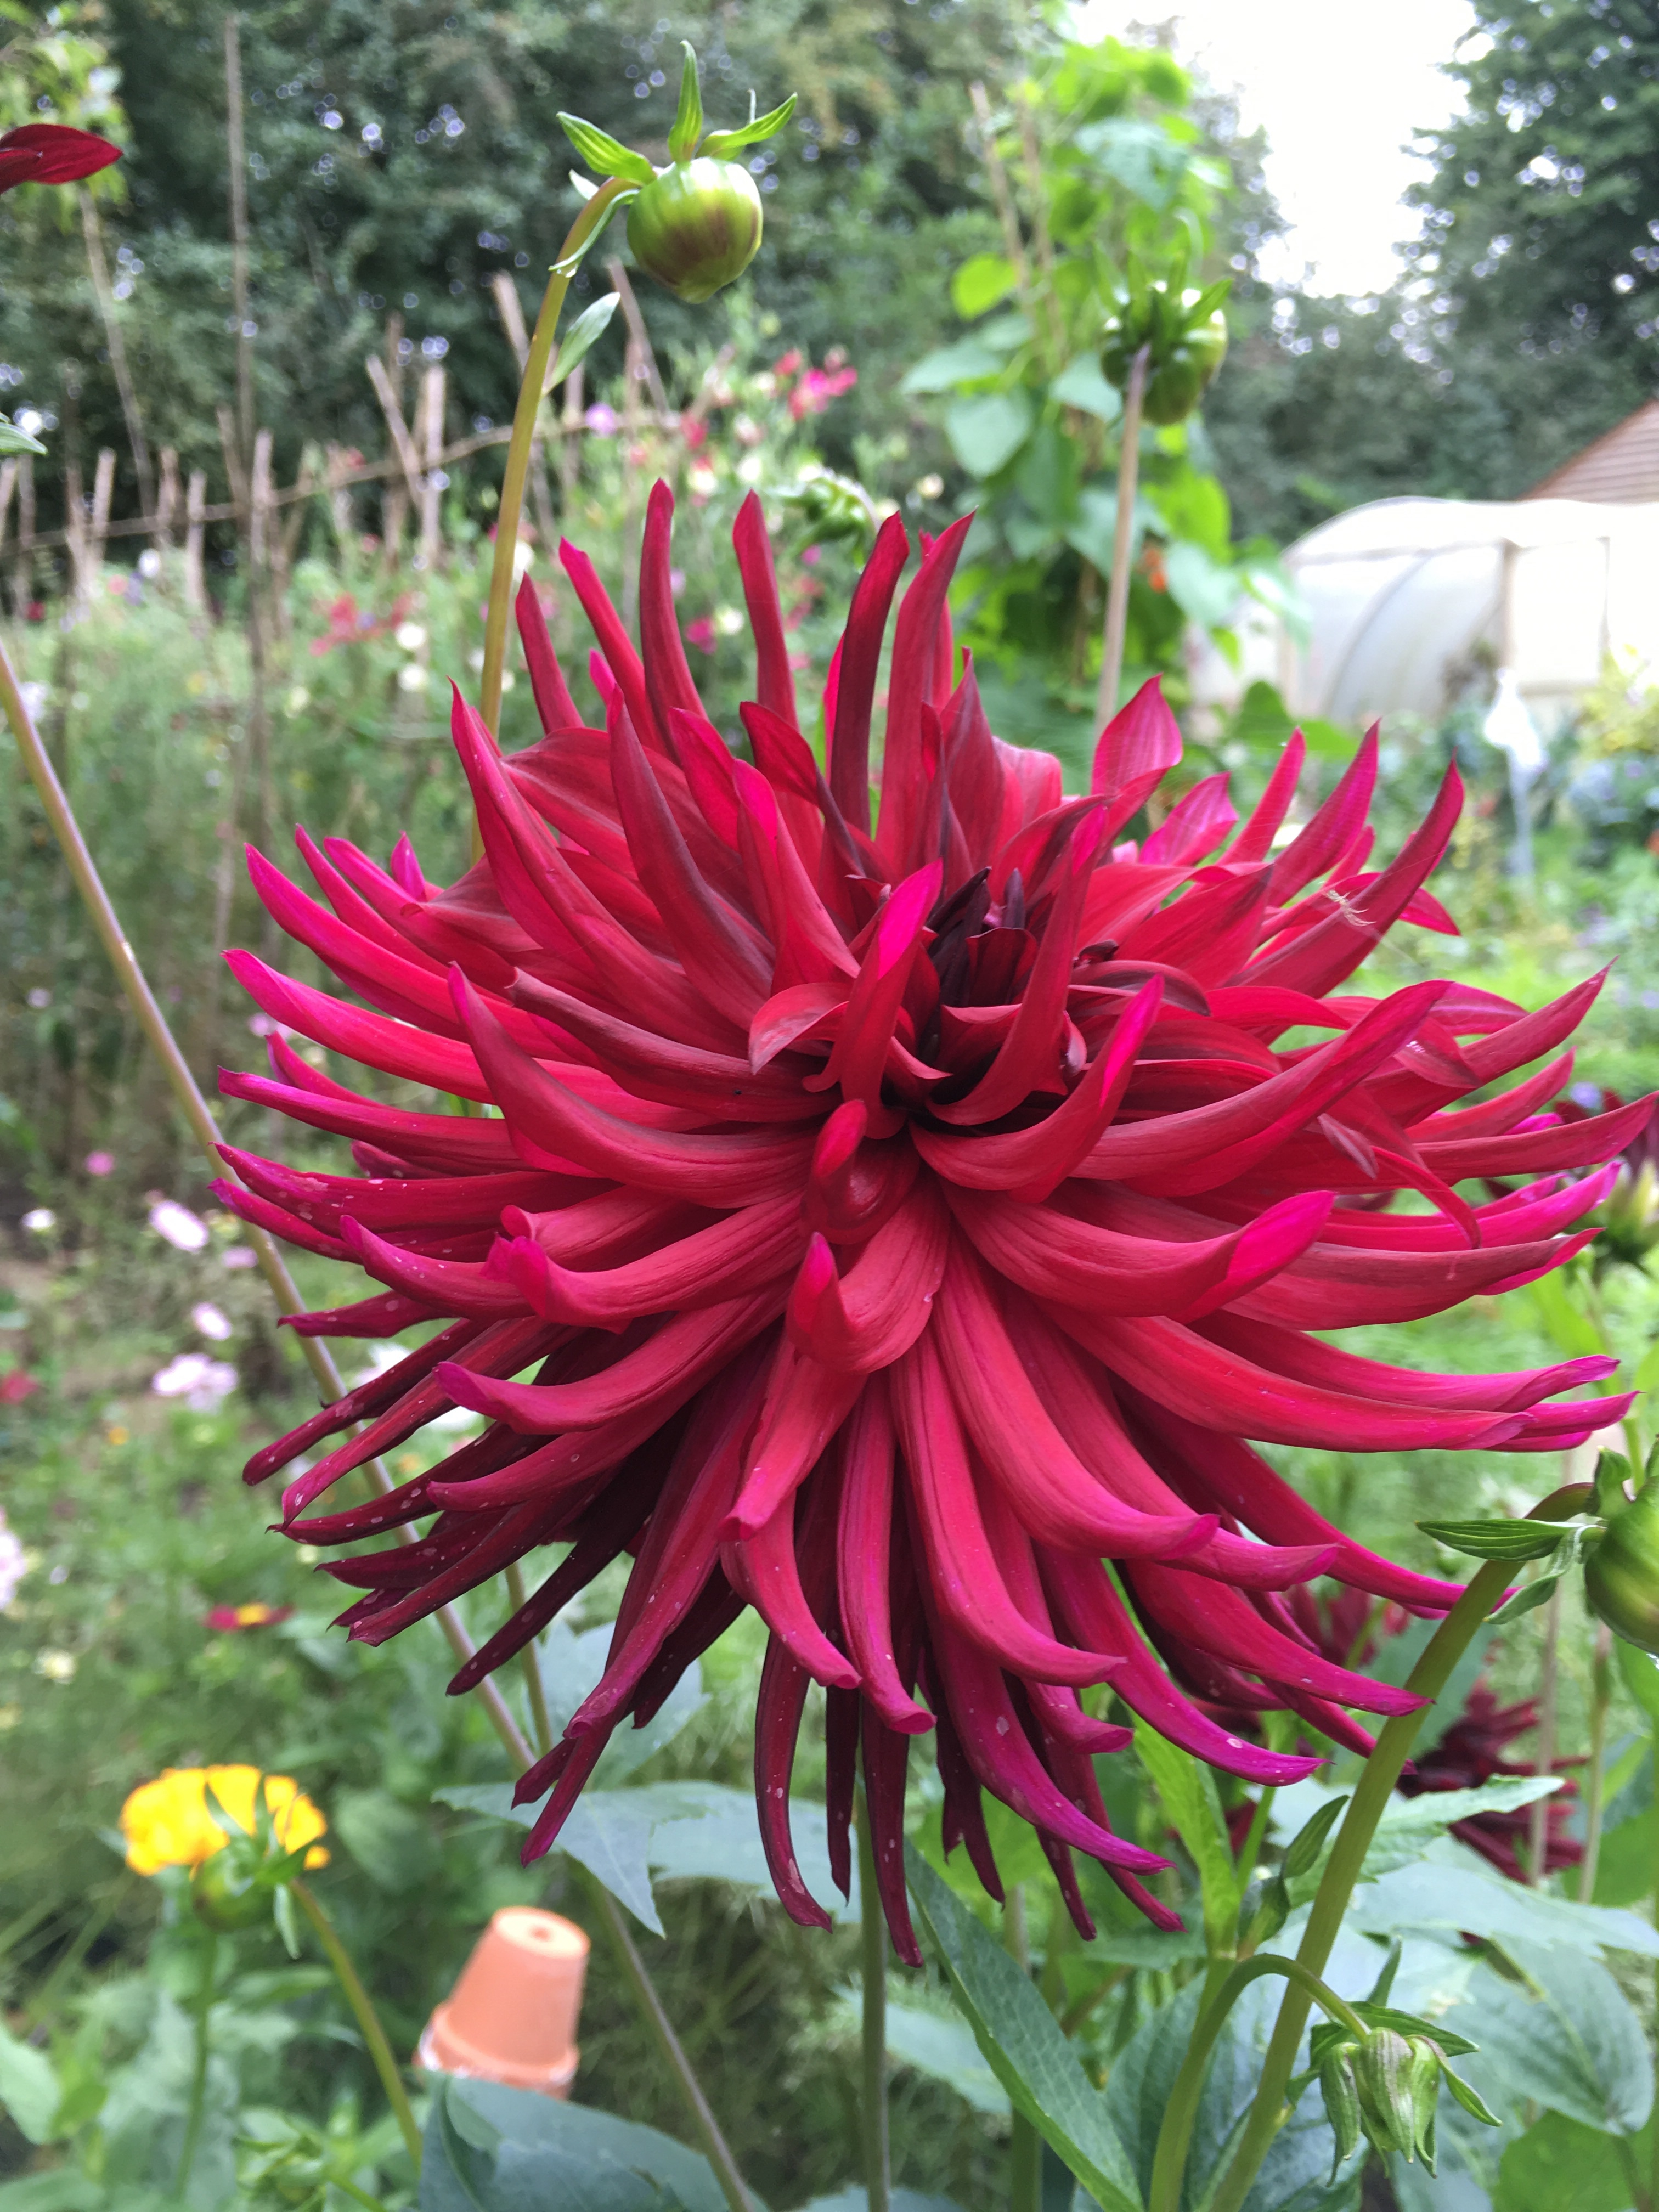
Nuit de’Ete, a lovely deep red cactus type. Lasts two weeks in a vase.

Nuit de’Ete amongst cosmos, persicaria and Ammi.

An pretty un-named variety grown from a packet of seed. Single flowers are much loved by bees and butterflies.

Dahlia David Howard. The best orange variety. Strong growing with long lasting flowers. Very beautiful in low autumn sunshine.

A very good book on dahlias has been written by Naomi Slade. Highly recommended. Just beautiful to sit and peruse over the cold winter months to come. When we will all need something cheerful to look at.

There’s a review of the book here : https://bramblegarden.com/2018/06/24/dahlias-beautiful-varieties-for-home-and-garden/

My dahlia tubers come from Gee Tee Bulbs: https://www.gee-tee.co.uk/bulbs/dahlias

Links: National Dahlia Society: https://www.dahlia-nds.co.uk/

In a Vase on Monday ( although this is Tuesday- I still like to join in when I can ) https://ramblinginthegarden.wordpress.com/category/gardens/in-a-vase-on-monday/

Follow me on twitter @kgimson

On instagram at karengimson1

Thank you for reading. Please leave a comment below and let me know what you are growing in your garden at the moment.

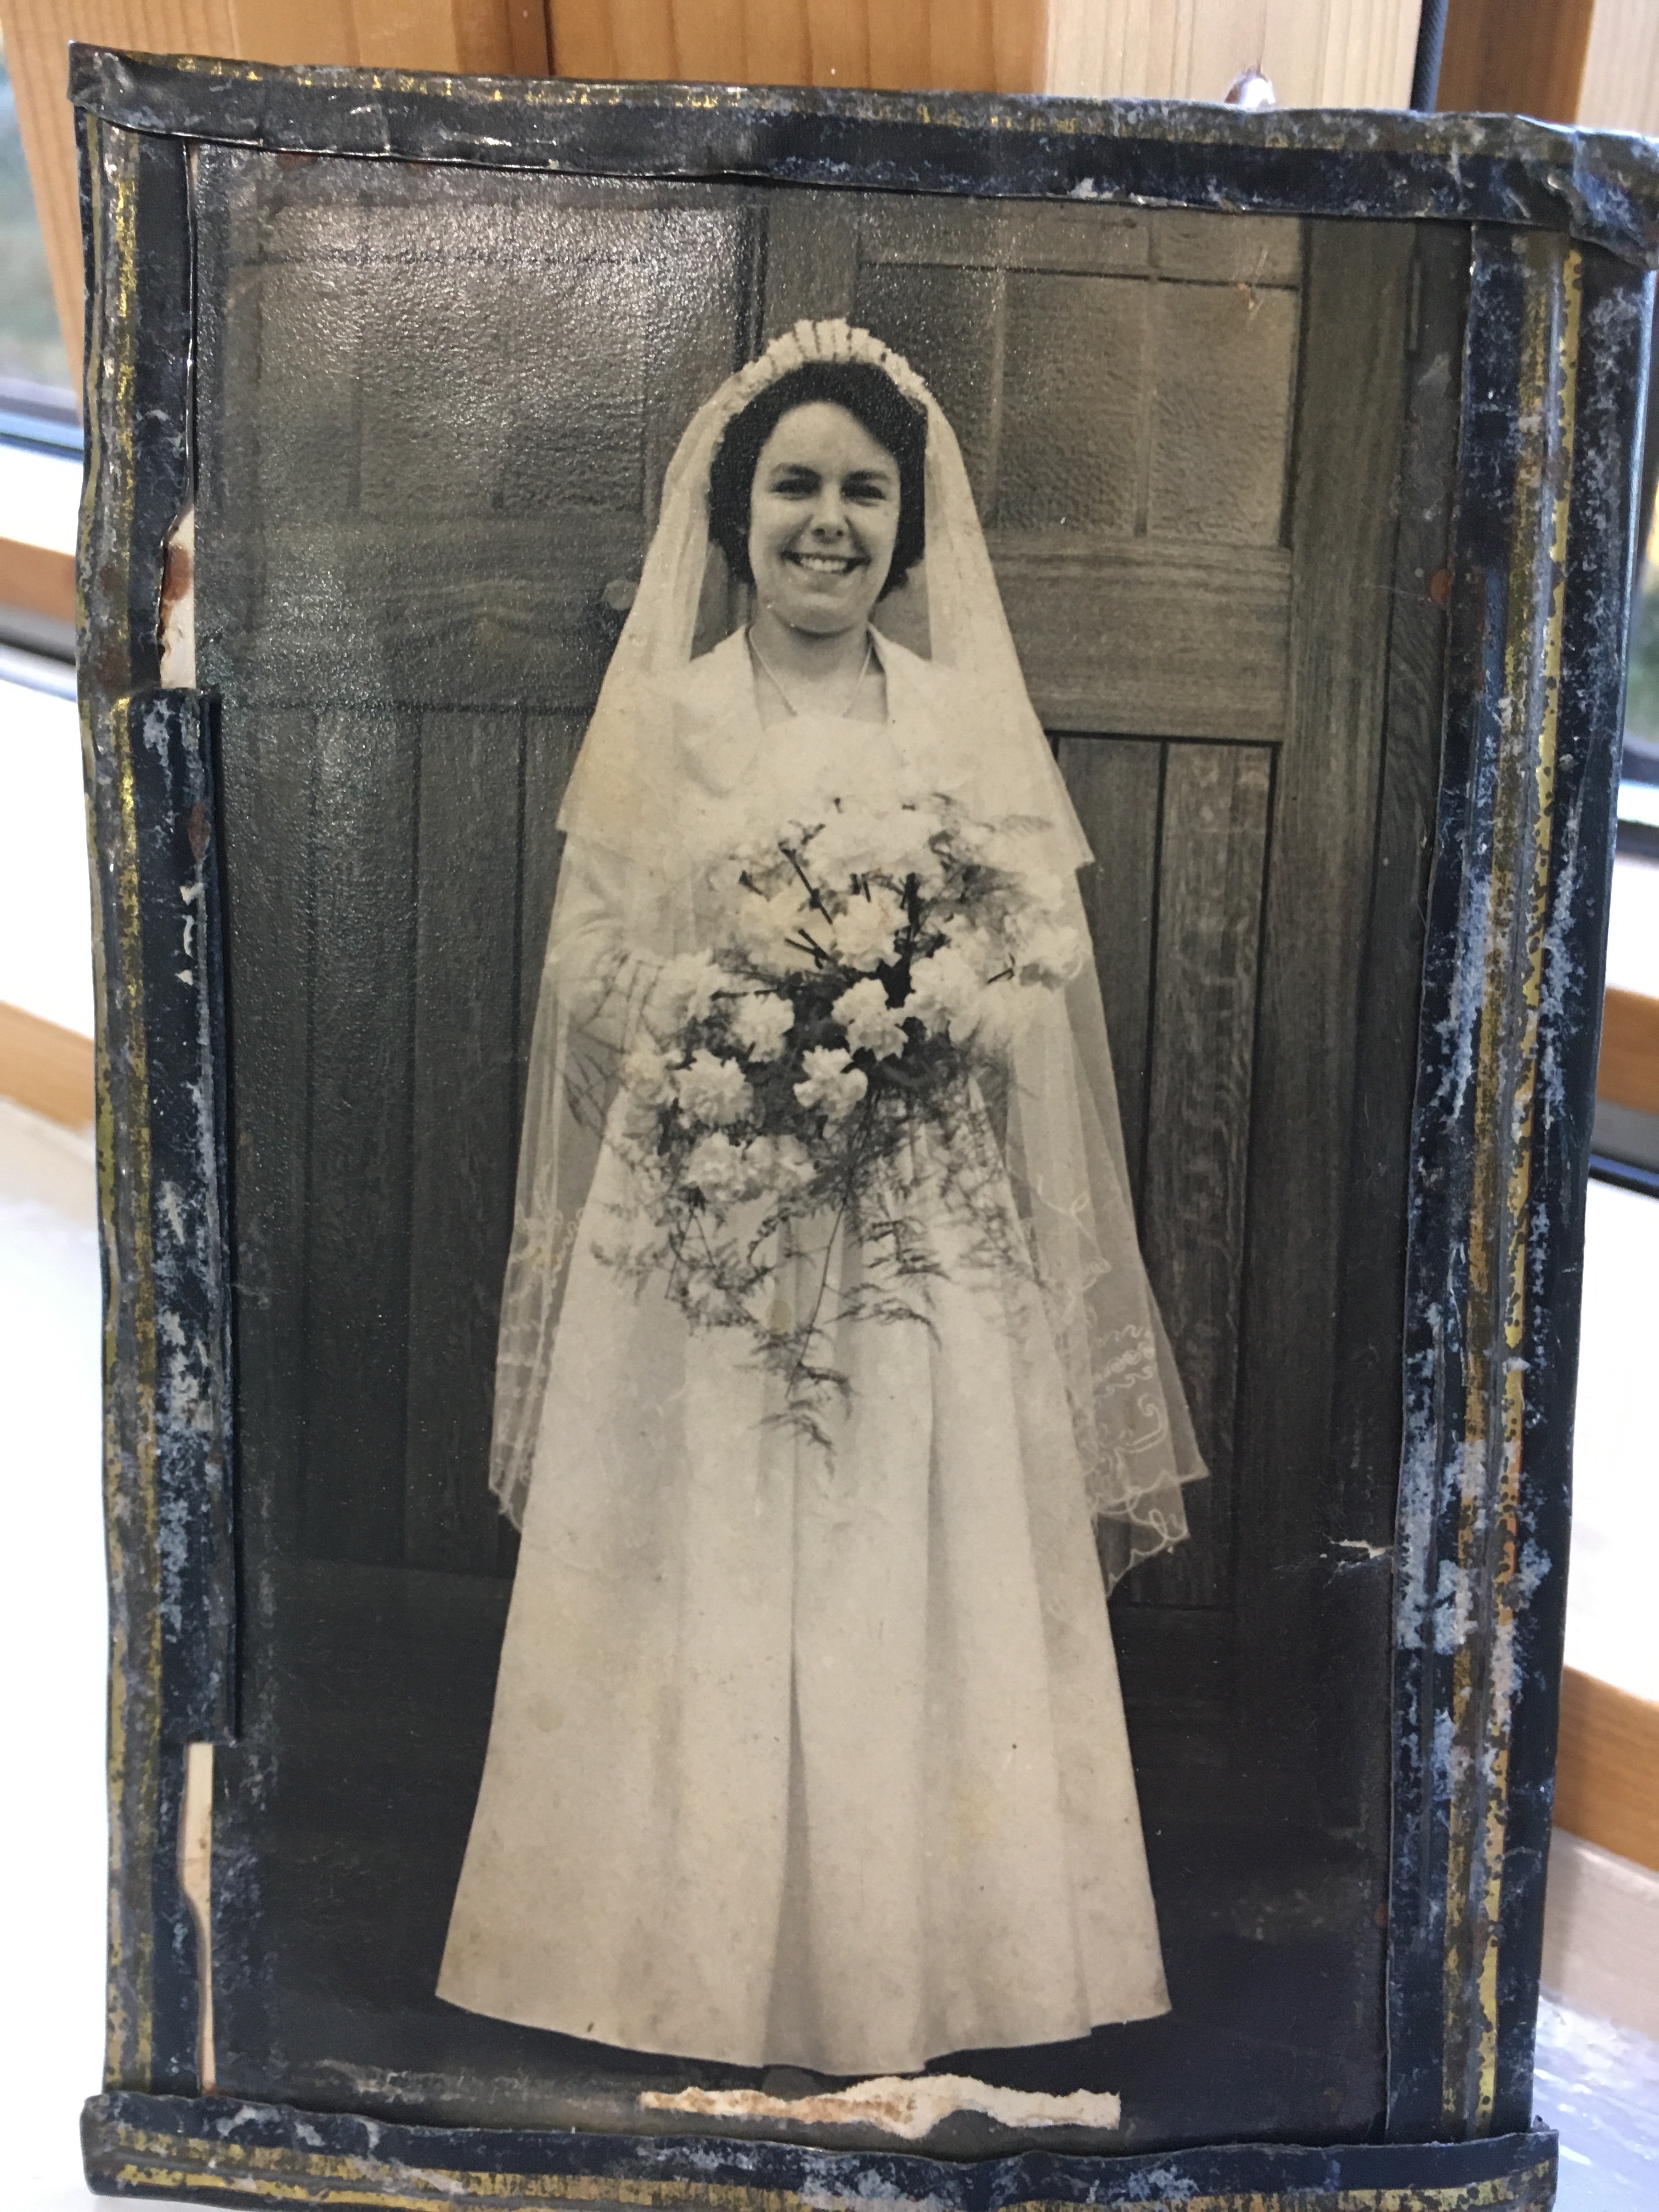
And, a photo I haven’t shared before. A picture of my mother in law Joan. Regular readers will know that I grow my cut flowers to keep a connection with Joan. It’s something we both love and it’s a way of sharing my garden with her now she is living in a care home.

I’m Growing New Potatoes for Christmas.

New potatoes are more than just a treat for early summer, you can enjoy them into the winter too. Started now, they will be ready to eat by Christmas. Here’s how I’m growing mine.

Special seed potatoes are available online, in catalogues and in garden centres now. I’m growing Charlotte and Pentland Javelin which are favourites for taste. You can also buy Nicola and Maris Peer. These are cold stored potatoes, primed ready to plant in August. You can also hold back some of your spring-bought seed potatoes, but you have to keep them in the bottom of the fridge until now, before planting.

Royal Horticultural Trials at Wisley showed that potatoes grow best in bags rather than rigid-sided plastic plant pots. You can buy special potato sacks, but I’m re-using compost bags. It’s a good way to recycle them.

I’m using Dalefoot salad and vegetable compost. Roll the tops down to form a collar, spike the bags to give good drainage, and fill them with 30cm of loosened compost.

Sit the seed potatoes on top of the compost. Ensure they are not touching, place them about 20cm apart.

Cover the potatoes with 5cm compost and water well. Place outdoors on a sunny patio. As the shoots start to grow, cover them with more compost and roll up the compost collar. Keep doing this until there is a 5cm gap left at the top for watering. What you are doing is “earthing up” the potatoes, without all the effort involved on growing them in the ground.

Move the bags, before the first frosts, into a greenhouse, porch or conservatory. By now the top growth will have died back and can be removed. Stop watering and keep the potatoes stored in the dry compost until you want to cook them. Because they have not been harvested and exposed to sunlight and air, the potatoes will not form hard skins and will retain that new potato taste and texture. In the past growers would have stored them in damp sand. My grandfather used to make “clamps” for vegetables such as potatoes and carrots, when vegetables had to last right through the winter without the availability of fridges and freezers.

I use soil association-approved Dalefoot Compost which is made from sheeps wool and bracken. It gives farmers in the Lake District an income for their wool which might otherwise go into landfill. It’s 100 percent natural and peat free, and contains a source of potash which makes fruit and flowers grow well.

My summer potatoes did well this year. I’m hoping for a small but tasty crop of new potatoes just in time for my Christmas dinner.

After planting my potatoes, I am sitting in my summerhouse with Grace cat, enjoying sunny weather and 23C temperatures, thinking of winter days ahead. I’m sure those tasty treats will be so welcome when the days are cold and wet.

You can listen in to my 10 minute gardening tips during BBC Gardens Hour today at 1.40.47 on the timeline on Sounds https://www.bbc.co.uk/sounds/play/p07hst9m Each week we try something new, do pruning, take cuttings, grow something from seed, help wildlife. Sometimes our projects work, sometimes they fail, but it’s a lot of fun trying, aiming to get the best from our garden plots.

Links: Seed potatoes https://www.amazon.co.uk/Taylors-Autumn-Planting-Potatoes-Christmas/dp/B008M4MHFC

Dalefoot compost : https://www.dalefootcomposts.co.uk/

Karen twitter : https://mobile.twitter.com/kgimson/status/1149241935502225408

Karen on instagram: https://www.instagram.com/karengimson1/?hl=en

Please feel free to share this blog post. Thank you for reading!

You might also like to read: https://bramblegarden.com/about/

And : https://bramblegarden.com/2019/08/04/dancing-with-bees-a-journey-back-to-nature/

Response on twitter. @bimblegarden said:

Summer fruit harvest and making garden jam

What a summer! My poor garden is burned to a crisp and everything’s wilting, including me. But the fruit garden is producing bumper crops. You’d think they would shrivel in 32C heat, but the black and red currants, gooseberries and blackberries are sweet and juicy.

Last night I wandered round the garden collecting a basket of fruit to make jam. I had planned to make strawberry jam from the pots of runners planted in April. But the tiny plants only yielded a handful of fruit. So delicious though. The plants only cost 60p each, mail order. I wrote about planting them Here. I’m hopeful of larger crops next summer.

The blackberries were the best I’ve ever seen though. A bumper crop and large fruit. Sometimes wild blackberries are so tiny they are hardly worth picking. But these soon filled a basket.

I threw the whole lot in a heavy based pan to make garden jam. Wow, what a scent. If it’s possible to capture sunshine and summer in a jar, this is the way to do it.

Garden Jam

To make 2 jars I used 500g fruit, 500g sugar 75ml water, juice of 1 lemon.

Method:

Place a saucer in the freezer for testing the setting point later.

Put fruit, water and lemon juice in a heavy based pan. Cook the fruit gently until soft.

Add sugar and simmer carefully until all the sugar crystals are absorbed.

Increase the heat to a rolling boil. After 10- 15 minutes, put a teaspoon of jam on the plate and gently push. If it wrinkles, it has reached setting point. If not, cook for another 5 minutes, taking care not to burn the jam.

Stand for 15 minutes

Pot into sterilised and warmed jars.

Fresh scones :

3oz butter

1lb plain flour

Pinch salt

1oz caster sugar

1.5 tsp. baking power

2 eggs and 6floz milk beaten together.

Add all the dry ingredients and rub together. Add liquids and mix carefully. Don’t over handle the mixture

Roll out thickly and cut into circles. Brush top with a little of the reserved egg/ milk mixture.

Bake for 10 mins until golden, oven temp. 230C, gas mark 8

Eat whilst still warm – or as soon as possible. Can be frozen as soon as cooled, to keep fresh.

I often ask twitter friends for recipes and gardening advice. Here’s a reply that came from Bob Flowerdew. I’m looking forward to trying his recipe.

And this came from June Girvin, which is similar to the recipe I ended up with. It’s absolutely delicious.

After all that foraging and cooking, we sat in the 1930s summerhouse, turned to face the cool woodland and pond and feasted on the jewels of the garden.

Surrounding us, there’s sounds of harvesting and baling. There’s a scent of new hay and oats on the breeze, and we watch entranced as barn owls swoop across the empty fields, like ghosts. They don’t notice us sitting quietly amongst the trees.

Here’s this week’s Garden Hour on BBC Radio Leicester where I chat away about what’s happening in my garden. Put your feet up and have a listen in sometime. The programme starts at 2.10.27 on the timeline. And the music’s not bad this week too.

http://www.bbc.co.uk/programmes/p06cd1bd

I am @kgimson on twitter and karengimson1 on instagram. Please share this on any social media platform you like, and don’t forget to leave a comment below. Thank you.

Fact sheet for growing strawberries /recipe for ten minute strawberry jam biscuits

If you listened in to the gardeners’ phone-in programme this week on BBC Radio Leicester you’ll have heard us giving hints and tips on planting and growing strawberries. Here’s a list of do’s and don’ts to get the best from home grown crops.

Buying bare-rooted runners, or root stock, is an affordable way to buy strawberries online or via seed and plant catalogues. It’s a good way to buy named varieties and virus free stock.

I’ve chosen the Plant Heritage Collection from Marshalls. 30 runners for around 66p each.

Royal Sovereign : A well-known mid season strawberry famed for flavour. Large juicy fruit. Crops in early summer- and again in autumn.

Cambridge Favourite : Reliable and popular variety. Good for jams and preserves.

Red Gauntlet: Mid season, heavy cropper. Fruit is held well above the ground. Good for damper soil, or for growing under cloches or in tunnels. Some resistance to botrytis.

1. When the plants arrive, take them straight out of the Jiffy bag and either plant into 3″ pots or straight into the garden, if soil and weather conditions are suitable.

2. Choose a sunny, well drained spot – not in a frost pocket

3. Enrich the soil with well rotted garden compost, organic Plantgrow fertiliser, or peat-free sheeps wool and bracken compost from Dalefoot Compost.

4. Planting depth is crucial to success of the runners. The crown, the thickened area where the leaves are attached to the roots, should be resting at soil level. Too high and the plants will dry out. Too deep, and they will drown.

5. Don’t plant where tomatoes, chrysanthemums or potatoes have been grown. The soil may harbour wilt disease.

6. Watering techniques are important. Do not drench the leaves and leave them wet overnight. The plants are more likely to suffer from moulds and the fruit will rot. Either use a leaky pipe, or push the watering can through the leaves to water at ground level.

7. Feed every 7-14 days with a high potash liquid fertiliser. I use seaweed extract, but you can also use tomato fertiliser. Plantgrow also has a handy liquid fertiliser in its range.

8. Protect the flowers from frost using a layer of fleece. The flowers are easily damaged and turn black. A whole crop can be lost to frost overnight.

9. Cut back all leaves and remove straw mulch after fruiting to prevent a build up of pests and diseases. We use chopped mineralised Strulch.

10. The plants will naturally produce runners. Stems will arch over and where they touch the ground, new plants will grow. Pot these up and renew your strawberry beds every 3-4 years. The old plants are best discarded after this length of time as pests and diseases start to take hold.

11. Vine weevils love strawberry plants. There’s a new organic nematode treatment that can be bought off the shelf. Previously treatments had to be posted out and used fairly quickly. The new nematodes from Neudorff are easier to buy and use.

STRAWBERRY JAM ALMOND BISCUITS

These are a family favourite and only take 10 minutes to make. Lovely with morning coffee, or for afternoon tea.

Ingredients: whizz together

200g caster sugar

115g butter

115g ground almonds

115g plain flour

1tspn baking power.

1 egg

3 drops almond essence.

Rest dough in the fridge for one hour if you want biscuits to retain their round shape. I was in too much of a hurry, so mine turned out flat.

Take teaspoons full of dough and roll in the palm of your hand. Place on a baking tray. Make a well in the centre with a spoon handle or little finger. Fill with strawberry jam. Top with slivers of almond.

Cook in oven at 200C for 10 minutes. Keep a close eye on them as they soon burn.

Will last for three days in a sealed container. If you can resist them that long.

Here’s a link to the radio programme. Have a listen in at 2.08.18 on the timeline.

bbcleicester http://www.bbc.co.uk/programmes/p063rcnf

Here’s some fruit tarts I also made with the home-made jam. Totally delicious! Wonderful after a hard day working in the garden.

Click on the highlighted links for more information. These are not affiliate links.

What new plants are you trying out this spring and summer?

In a Vase on Monday ….. er Wednesday.

Defeated by torrential rain, I’d given up on gardening until today. Here’s a brief glimpse into my day.

A quick peek in the greenhouse before I go off to work. And it’s sunny in here. At last. Yippee!!! Windows opened. Wonderful scent. Just love primulas. So cheerful.

Second year hyacinths are never as good. But they still have a value. I love the intense blue of this one, set against the yellow of the dwarf daffodils. I’m growing Tete-a-tete in pots for picking. And in honour of my wonderful Welsh grandmother, Tenby daffodils, which grow wild in Wales.

Love my newly acquired plant pots. The green one on the left is from Burgon and Ball , and the one on the right is from new company Plant Furniture.

After a quick snip of flowers for the show, I’m off to Radio Leicester for the Gardeners’ phone-in, 11-12 on a Wednesday. A fun place to work. Sophie and Jack the producers look after me. I’m always so grateful for all the encouragement and support they give. I probably couldn’t do it without their kindness to be honest.

We chatted about growing tomatoes. I’m growing bush tomatoes in containers and hanging baskets alongside programme host Ben Jackson. We’ve got cherry tomatoes from Mr Fothergill’s, Suttons and Thompson and Morgan to try out. And we’ll be growing them in Dalefoot sheep wool and bracken compost as an alternative to peat. It’s always more fun growing something with another person. I haven’t got an allotment, for example, where you would have neighbours to chat with and share hints and tips. so I’m going to grow along with Ben, and we’ll share seeds and compost and compare results. It will be a fun project to do over the summer.

We always have a laugh on the gardeners’ programme. If I see something a bit unusual, I’ll take it in to show the team. Today I took in these Badger Paw gloves. I spotted them at the Garden Press Event a few weeks ago and thought they looked interesting. The event showcases new ideas, new seeds, tools and machinery, containers and plant pots- all heading for supermarkets, garden centres and nurseries this summer. The Badger Paw is said to be perfect for preparing soil, planting, weeding and clearing roots. It’s made by Creative Products and has breathable stretchy fabric. What we couldn’t work out though was why the claw is only on one hand. It’s an interesting concept and I’ll let you know how I get on with it.

My posy of flowers this week also contains hyacinths – which just seem to keep on flowering. They love the cold weather. Tucked inside my paper wrapping are iris reticulata, hellebores, snowdrops, and dogwood twigs from my new florists’ “Hedge-in-a-Box” kit from Hopes Grove Nurseries. I spotted their ingenuous hedge kit for gin makers at the GPE. On the stand there was a sign saying make any suggestions for new hedge kits. So I asked if they could design a hedge for florists with coloured stems and flowers for all year round picking. And my wonderful “hedge-in-a-box”arrived on Monday! I’m really thrilled with it.

Thanks for joining me today. Thanks also to Cathy for hosting this meme and kindly allowing me to join in later in the week when either the internet – or the weather – has let me down.

Click on the highlighted words for more information. They are not affiliate links.

BBC Radio Leicester Gardeners’ phone-in recipes

CITRUS MARMALADE AND ORANGE FLAPJACK

February is a cold, dark, short month. But everywhere there’s signs of spring. Wild violets and the first primroses pop up by the front gate. And snowdrops cheer up the hedgerow, pushing up through hats of curled, brown leaf mould.

It’s traditionally a month of self-denial and fasting. Many people give up something for Lent – chocolate, wine, or favourite foods. Shrove Tuesday or Pancake Day is a way of using up egg supplies before the fasting period begins. I make orange curd to use up eggs and butter.

But I also like to make marmalade now. An antidote to winter. I line up pots of marmalade along my kitchen window. A kind of ribbon of orange light. My own stained glass window. Here’s my favourite recipe, which I make with Seville oranges – and some citrus fruits from my heated greenhouse. Tucked up indoors and standing over a steaming pan of oranges makes for a heart-sing moment. And we need plenty of those in February. My grandmother’s old saying is usually true. As the days lengthen, the cold strengthens. I highly recommend staying indoors, keeping warm and making marmalade.

ORANGE MARMALADE

2lb or 900g fruit ( I used Seville oranges, and some kumquats and calamondin fruit from the greenhouse.)

1 lemon

4lb or 1.8kg granulated sugar, warmed

4 pints water

6 x 1lb jam jars

Square of muslin

Cut the lemon and oranges in half and squeeze out the juice. Put any pips or pith that cling to the squeezer into a square of muslin placed over a pudding bowl. Now cut the peel into quarters. Scrape off the pith and add to the muslin. Cut the quarters into thin shreds. Add the juice and peel to the water in a heavy-based preserving pan. Tie up the muslin square and tie loosely to the pan handle with the bag suspended in the water. The pith contains pectin which will help the marmalade set. Simmer gently uncovered for 2 hours until the peel is completely soft. Remove the muslin bag and set aside to cool. Put a plate in the freezer. Pour in the sugar and heat gently until the sugar crystals have melted. Squeeze the muslin bag to extract the jelly-like pectin. I used plastic gloves, or you can press it between two saucers. Increase heat. As soon as the mixture reaches a fast boil, start timing. After 15 minutes, spoon a little of the marmalade onto the cold plate and pop in the fridge. If it has a “set” the marmalade will crinkle when you push it with your finger. If not, continue to boil for another 10 minutes. Remove pan from heat and stand for 20 minutes. Add a tsp butter to disperse scum. Pop the jam jars in the oven to warm for five minutes. Pour the marmalade into jars with the aid of a funnel, cover with wax disks and seal while still hot. Label pots- and enjoy!

A visit to my mother-in-law’s house would always find us searching the pantry for the cake tin. Over the past 50 years, you could pretty much guarantee to find some flapjack in there. Joan recently gave me all her treasured recipe books. Here’s my own version, adapted from Joan’s family favourite. It travels well and is ideal for picnics.

ORANGE AND WALNUT FLAPJACK

250g or 9oz unsalted butter, chopped into pieces

250g or 9oz golden caster sugar

175g or 6oz golden syrup

425g or 15oz porridge oats

50g or 2oz walnut halves,slightly crushed.

Grated zest of 1 orange.

3 tbsp orange marmalade

160C gas / mark 4 for 30 minutes

28cm x 18cm shallow baking tin

Melt together in a microwave the butter, sugar, and golden syrup. Stir into the oats, walnuts, and orange zest. Tip the mixture into a lined tin and level it off. Bake for 30 minutes or until the edges are golden brown and the centre is still slightly soft. It will firm up as it cools. Mark into 12 pieces while it’s still warm. Leave to cool and then brush the top with melted orange marmalade. Keeps for a week in an airtight tin.

Each week on BBC Radio Leicester there’s a Gardeners’ Phone-in programme between 11am and 12 noon. I like to take in a posy from my garden, showing what’s in flower all year round. And I also take in something I’ve made using produce from my plot. This week it was a jar of marmalade and some flapjack. Tune in on the i player to listen to the programme which starts at 2.11.31 on the timeline at http://www.bbc.co.uk/programmes/p05t8n69. Meanwhile, I’ll leave you with a photo of my greenhouse from last summer. A reminder of lovely warm weather to come.

How to Plant Prepared Hyacinths. Fairy Lights for the Greenhouse- and an update from this week’s BBC radio programme for gardeners

It’s amazing how a few little touches can make all the difference. In defiance of the cold, dark days, I’ve brightened up the greenhouse with mouldable lights. These are tiny fairy lights on a copper wire. They can be twisted around floral arrangements and basically they hold their shape without damaging the flowers. I’ve used chrysanthemums from the poly tunnel for this display. It makes a lovely warm glow at a time when we all need some winter cheer.

I’ve chosen indoor battery-powered lights from the Christmas range at Wilco . The 2.2m cable contains 20 warm white lights for £3.50 and includes the battery. I’m going to wrap them around plant pots in the greenhouse next.

We talked about mouldable lights on this week’s BBC radio gardener’s phone-in programme. You can listen in on your phone or computer on the i-player. I wrote about how to tune in Here. https://bramblegarden.com/tag/radiogardening-howto-i-player-bbc/.

You can listen to any radio programme for 28 days after the broadcast. And there are special programme clips and podcasts too. The gardeners’ phone-in is on BBC Radio Leicester every Wednesday between 11am and 12 noon on 104.9 FM and digital. And on Sunday there’s local radio’s longest-running gardening programme, Down to Earth hosted by Dave Andrews, between 12 and 1pm. We will be taking phone calls live in the studio this coming Sunday, December 3rd.

Here’s a link to this week’s Wednesday programme hosted by Ben Jackson. http://www.bbc.co.uk/programmes/p05m8p6x. Move the timeline round to 2.07.57 where the programme starts. We talk about making Christmas presents from materials found in the garden- including jam jar succulents and cacti, and making bird feeders with fir cones. And our mid-morning studio treat, for all the staff, was Chocolate Tiffin made with fresh autumn raspberries from the plot.

Here’s some details on the prepared hyacinths we mentioned. These are some I grew to flower for Christmas 2016.

You will need to buy “prepared” hyacinths which means they have been put into cold storage to fool the bulbs into thinking they have had winter already. To complete the treatment at home, place the bulbs in John Innes No2 compost in 3″ pots. Put the pots in a cold dark cupboard in the potting shed, garage or basement. Or put them into a black plastic bag. Store them for 9 to 10 weeks at 9C. Water just once. At the end of 10 weeks, check over the pots and those with about an inch of leaves and a flower tip showing can be brought out into a cool bright place to grow on. You can make up displays for Christmas by selecting bulbs that look about the same height and putting them into larger plant pots together. Don’t bring them straight into a centrally heated house or the flowers won’t develop properly. The bulbs need to be grown on in cool conditions for another 22 days.

Here’s some hyacinths and forced narcissi I used to create an early spring display this year. You can also bring twigs of cherry blossom into the house and they will give an earlier flowering too. I wrote about forcing Paperwhites Here.

The scent is quite glorious. Interestingly, different varieties of hyacinths need varying periods of cold/dark treatment. The variety Pink Pearl needs 10 weeks, but Anna Marie needs just 8. So experimentation is needed if you wish to mix the varieties in a display. I would set the 3″ pots at weekly intervals and grow more than I needed so that I could select the right number of plants for my display. Just a reminder- always wear gloves when handling bulbs as they can cause skin irritation.

A very quick and cheap Christmas present idea we mentioned was jam jar succulents. Here’s the materials I took into the studio. You will need a small recycled jam jar, handful of ornamental washed shingle, small amount of moss from the garden, and a succulent or cacti from the garden centre. Mine is an offset from one of my own plants. You half fill the jar with shingle, wrap the succulent stem with moss and plant. Finish the present with a ribbon. Plants need virtually no water over the winter. In summer, water once a week with a tablespoon of water. Tip the jar up to allow any excess water to drain out. Do not allow the succulent to become waterlogged.

This one has been in the jam jar for two years.

Talking of Christmas presents ideas I love these RHS Gold Leaf Gloves. I’m practically living in them, they are so comfortable. I may be a fairly scruffy gardener, with old trousers and holes in my jumpers, but my hands are glamorous.

Here’s a quick peek of Ben’s garden, which we talk about on the show. It’s a 2.5 by 2m raised bed, a bit overshadowed and plagued by slugs. But we’ve planted winter veg, salads and flowers – to see how much we can grow in a small, less than perfect plot. The kale and chard keeps growing through the cold weather. You just harvest the outer leaves, leaving the growing tips to keep going. I’ll keep popping by now and again to see how Ben’s getting on with the project. I’ve got a matching plot at home so we can compare progress. I have to say, Ben’s is looking better than mine at the moment. My plot is on a windswept ridge, and his is in a pretty, walled garden.

And after all that talking- we tucked into my Chocolate and Raspberry Tiffin. I wrote the recipe the recipe Here. Click on the link to see the recipe.

Do you have any recipes to share – or ideas for Christmas presents using materials from your garden? I’d love to hear your views.